


Why do you need to know some steps to soundproof media room and home theatre? Here’s the reason. It’s finally the weekend after what feels like an eternity. You have slogged hard every single day of the week. You have prayed for the weekend—“Why isn’t it Friday yet?” And just when you thought you couldn’t take it any longer, the weekend comes to your rescue. You made it. Yay, you!
It’s time for a breather. You decide to wear your most comfortable jammies, grab some snacks and let the no-brainer film take over. We’re not judging, your brain needs the rest. You start the film. You’re five minutes in. The actor is looking good. He’s put in a lot of effort for this role. Gunshots fired… this is where the action begins…
“TURN THAT NOISE DOWN!!!”
Uh oh! Someone in the house has a problem with all that noise you’re making. And now, you have a problem with them. You hate them! They always do this! It’s the weekend!
Come now… don’t be upset. it might not be legal or ethical to eliminate the residents of your house, but it’s certainly possible to eliminate the noise.
At Soundproof Warehouse, we understand that recreation is a necessity. And this necessity needs fulfilment. So today, we’re here to show you how you can soundproof your media room. For your sake… and everyone else’s.
Here’s what we’re going to tell you:
- What is the science behind the noise?
- How are we getting rid of the noise?
- What do we need?
- How much time will it take?
- The steps to soundproofing!
The science behind the noise
First things first—sound is an energy that is produced when things vibrate. When this sound is unwanted or annoying, it’s called noise. In order to soundproof a place or thing, we need to get rid of vibrations. We can do this by either absorbing the sound or by stopping it.
In your media room, the vibrations travel in multiple ways. The noise gets out through walls, floors and even ceilings. To keep all that noise in, you need to soundproof each and every one of these areas. While a lot of people soundproof just the walls, we believe that it leaves the job incomplete.
Another thing to remember is that a chain is only as good as its weakest link. We are talking about windows, doors and penetrations here. Let’s bring in a technical word—Sound Transmission Class (STC). STC is a rating which is used to measure how well a material reduces the transmission of noise. The higher the STC, the better the product.
Rule of thumb—if you have over 12% of a high STC boundary compromised by lower STC/Rw materials (windows, doors, penetrations) it will reduce the STC/Rw by 25-45% depending on the transmission loss of the other components. We know that these numbers can be confusing but they’re good to put things into perspective.
Keeping in mind the ability of sound to leak, we will soundproof everything including walls, ceilings, floors, doors and windows.
How are we getting rid of the noise?
What we offer here is a ‘noise reduction package’. It targets the sound transmission of a media room with a powerful subwoofer and powerful speaker system—the kind that real movie-buff would love (we’re looking at you, buddy).
Good speakers will create a wide range of audible frequencies. These powerful impulsive sounds range from 50hz-15khz. Our soundproofing tutorial attempts to absorb and contain all these frequencies! And while you’re reading this, it’s useful to note that this tutorial could also soundproof a home drum studio.
What do I need?
Since we like you so much, we are going to tell you what you need for every single soundproofing step. So skip to the steps if you want to get the equipment ready.
Please note that these instructions are based on the assumption that the room’s size is 4m x 3m. Make your calculations accordingly.
How much time will it take?

2 Weeks
Yep, our tutorial will take a dedicated person about two weeks. This is keeping in mind that you don’t exert yourselves too much. We have divided every task by time so you can match your schedule accordingly. We’re nice that way! 😉
LET’S BEGIN!
- Get the room empty
You need: Your muscles, an assistant (optional)
The first step is to simply remove all the furniture, paintings and decoration from your room. Empty it all up because you’re going to need that space. - Remove the existing plasterboard (Appx. 6 hours)
You need: hammer, trimming knife, Jimmy bar/Pry bar.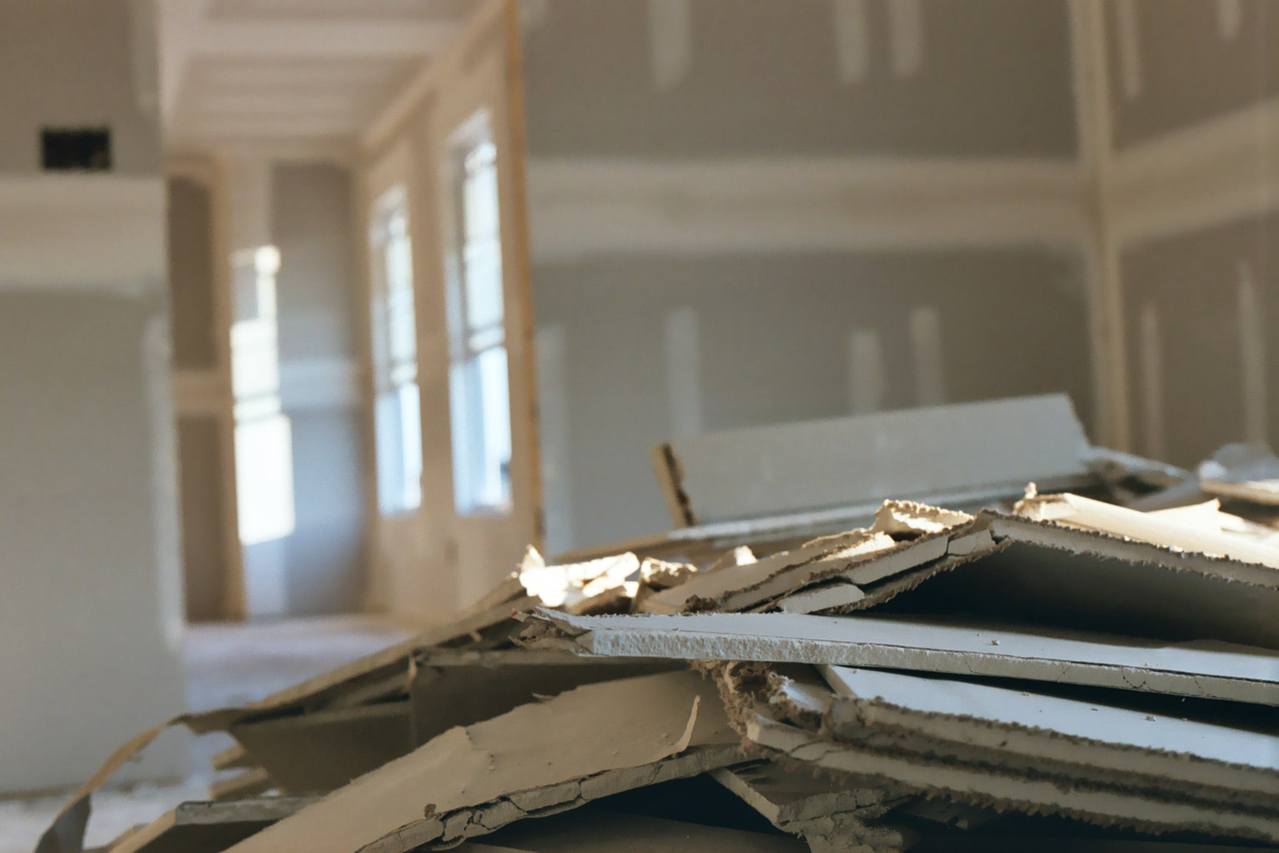 Look for the sheet joints which are usually under the Cornice. Cut along the Cornice using a trimming knife to expose the joins. Then, simply rip the plasterboard sheet off using a pry bar. Do the same for the ceiling. Removing the existing plasterboard is necessary to pave way for a larger air gap.Why is that? A larger air gap allows for less sound leaking from where you are (the source room) to where the person getting disturbed is (the receiving room). Another benefit—ripping things up is quite cathartic.
 - Remove the existing door to the room (Appx. 2 hours)
You need: Flat-head screwdriver, hammer, a thin book
Shut the door before you begin. Now, as weird as it sounds, put the book under the door before you unhinge it to keep it steady. This also helps protect the floor from scratches (if you weren’t planning on soundproofing and revamping the floor).Using the hammer and the screwdriver, push the pin-up from the bottom door hinge. Once it lodges upwards, it is easy to remove it. Do the same with the top hinge. You can simply remove the door using your strength now. Wow, look at you go!Why do we need to do this? It is to prepare your room for some extra soundproofing around the door. Most people don’t realize that the doorway is where most of the sound gets into your room from. Let’s change that. This is just step one of that process. We’ll leave the rest of it for later (Step 8 to be exact). - Eliminate recessed lighting (Appx. 1 hour)
You need: voltage tester, electrical tape
Recessed lights are the ones that are “inside” your ceiling. Get rid of those for optimal soundproofing. The aim is to eliminate the holes in the barrier system.The first thing you need to do is to shut the circuit breaker off in order to avoid nasty shocks.Once you have confirmed that the power is disconnected using a voltage tester, remove the plastic connector and free the fixture by untwisting the wires.Recessed lights are terrible for soundproofing. They leak sound in/out and are also a fire hazard around insulation. This is why we insist that you use track lighting instead to achieve optimal performance. These have an industrial look and don’t require too many holes.If you are hell-bent on re-installing recessed lights, be prepared for some inconvenience. There are government rules about Insulation Contact (IC) ratings. A soundproof and fire-safe back box may be ideal. These back boxes will need to be fixed on the ceiling with insulation surrounding them. We won’t get into too much detail because we do not recommend this option. We also insist that you hire a licensed electrician for all electrical work.Put some electrical tape on the wires till we get back to talking about track lighting in Step 13. - Inspect and seal stud-bay openings (Appx. ½ an hour)
You need: Fuller Fire Sound
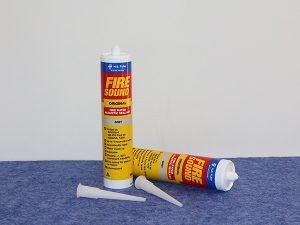
Stud-bays are cavities between the studs. Like bays in the middle of studs? You need to check junction boxes, electrical cables, holes from room to room, etc. If you find any openings, seal them with Fuller Fire Sound. This prevents noise leakage or barrier leakage. Every hole must be sealed!Another important thing to remember is that the stud needs to be clean—which means there should be no nails. Chisel it up if you have to! - Insert insulation: Fibertex and Fiberglass (Appx. 4 hours for each—wall, ceiling, floor)
You need: Fibertex boards, Fiberglass, dust mask, disposable gloves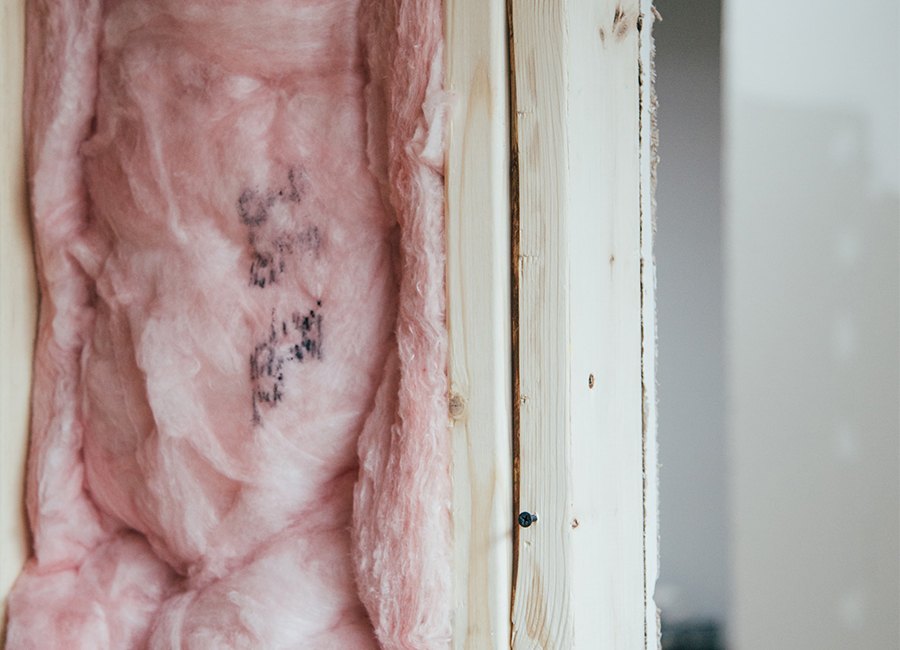 Before you start anything, put on some gloves and a dust mask. Both fibreglass and Rockwool (which our Fibertex is made of) can make your skin itchy and produce fine dust. Use our 50mm Fibertex 650 boards as the first layer of insulation. Insert them at the back of the plasterboard in connecting rooms. Cover the wall up with the product. You can cut the Fibertex board and insert strips into and around obstacles in the stud bays (wires, pipes, etc.). This absorbs any cavity resonance of the stud bays before it sees the other connected rooms. After this, insert at least 32kg per cubic meter fibreglass insulation in the stud bays. The fibreglass needs to be inserted on top of the 50mm Fibertex board.This absorbs any sound that might be present off the back of the media room walls and some cavity resonance that may be leaking. Do the same in the ceiling and floor joist for maximising soundproofing.Fun fact: Fibreglass is actually made out of glass—they are super-thin glass filaments woven together for insulation. This ‘glass fibre’ is made by melting and stretching silica sand.
 - Install Sound-Stop 5 (Appx. 1 Day)
You need: Sound-Stop 5, Super-Grip tape, wafer-head screws/1-inch washers/cap stapler.
It is best to start from the ceiling when it comes to Sound Stop 5. For the ceiling, use either wafer-head screws or 1-inch washers to ensure that SS5 stays put. You can also use a cap-stapler for securing it. Ideally, 4 drills per stud should do the trick.When it comes to walls, install one layer of Sound-Stop 5 (review install instructions) to the studs of the walls in a horizontal manner. Minimize seams, overlap seams, and seal them with Super-Grip tape. The best thing about Super-Grip tape is that it has been designed specifically for Stop-Sound 5.Attach SS-5 from stud to stud leaving a little space of about 5-10mm. This tape won’t peel off so seal all those gaps, use it well and don’t pull it taught!Remember — Although optional, you can also install an additional layer of Sound-Stop 5 and stagger the seams for a complete inner wall barrier treatment. This will take an additional day. Got the time and resources? We’d say do it! - Decouple two doors (Appx. 6 hours)
You need: Two doors of the same style, timber reveal
Remember that door we took out? Now is the time to get back to it. Except this time, we are putting back two wooden doors instead of one. Double doors for double the soundproofing. You need to frame out the doorway with a timber reveal. The reveal is the frame of your door covering the stud.By this time, we are assuming that you have already sealed the gaps between the door and frame using Sound Stop 5.Install one outside door with a threshold that seals the gap in the bottom. Have it swing-out. Then, in a separate frame, install another door of the same style that swings in. The hinges and knobs are placed diagonally opposite for this arrangement. This creates a high STC/Rw airlock and decouples the inside door from the outer barrier of the room and house.This is a critical step and must be performed for the ultimate soundproof room. A word of warning though—this can’t be done in a commercial setting since doors need to open outwards in case of an emergency. Simply installing a solid-core door is a better option in that case. - Install Resilient Channels (Appx. 1 day)
You need: Resilient Channels, nail gun
This treatment is done on top of the Sound-Stop 5 layer from Step 7. On the walls, insert resilient channels horizontally at a difference of 600 millimetres. These will be ideal when using a 16mm fire and acoustic grade plasterboard (next step). Ensure that the channels are placed all around the door framing in the room as well.Again, repeat the steps for the ceiling. This helps create an acoustical break—which simply means that it stops vibrations (that create sound) from the upper floor.It is especially beneficial for those that live in apartments and have upstairs neighbours. Don’t want them complaining about your amazing sound-system now, do we? - Install plasterboard using an acoustic sealant (Appx. 1 day)
You need: Plasterboard, acoustic sealant
We recommend installing 16mm Fyrcheck plasterboards on the resilient channels using minimal screws. Use Fuller Fire Sound on all butt seams of the plasterboard in a linear manner.Hold all joining corners of the room off each other by 3-5mm, including the ceiling.This allows all the walls and ceiling to move freely and not couple. Seal those gaps with an acoustic sealant as well. We don’t want any air gaps! Since we are on that topic, however, don’t forget to make the minimum required holes in the ceiling for track lighting (Step 13).If the plasterboard corners touch, they would become one huge mass which would allow the low frequency of the room to resonate more efficiently. Not only this, but the noise would also flank into the surrounding rooms with more intensity. That would be pretty counterproductive now, wouldn’t it? - Paint the room (Appx. 1 day)
You need: Paint, brushes, rollers Now that the walls look like walls, it’s time to paint them. You can use wallpapers as well—this step has nothing to do with soundproofing. There are some soundproofing paints in the market but they are only useful after 3-5 coats. Unfortunately, they don’t do much for sound absorption either, reducing only up to 7 STC points. Expensive and useless if you ask us.We will leave this step up to you and your sense of style. The same goes for your choice of flooring. Make your media room as good-looking as you want!
 - Install Absorption panels (Appx. 2 hours)
You need: Stratocell® Whisper™ / Fibertex covered in fabric, screws.
This is an optional finishing step for walls and ceilings which is both efficient and attractive. You can choose to only install absorption panels in certain sections or choose to cover the entire wall/ceiling. These panels go on top of the plasterboard.You can mechanically fix them using screws.Stratocell® Whisper™ offer excellent sound absorption (NRC:1 Which is the highest possible rating). They are lightweight and washable as well. Ideally, this is the product you want to use.A more customizable and cheaper option could be using Fibertex. Wrap a decorative fabric of your choice to create your own sound absorbers.These panels will help absorb a fair amount of energy in the room before the boundaries of the room encounter it. This will also aid in tuning the room’s reflections and tonality to your taste. - Install track lighting (Appx. 1 hour )
You need: A track lighting kit, screws, screwdriver
We are so glad you decided to ditch those recessed lights. It is fairly easy to install tracked lighting. You can use the track-stick as a means to measure where you need to drill holes in the ceiling for plasterboard anchors. Once you have the tracking stick installed, insert the floating-feet adapter.The track heads go into the track stick. Insert the number of track heads recommended by the company’s installation guide. Then insert the bulbs.Simply change the direction of the lights according to your convenience and that’s it! Your tracked lighting system is ready. If this step felt like it was full of jargon, believe us—it’s way easier when you look at the installation guide for the tracked lighting system. Hey! We never said we were light experts now, did we? - Secondary Glaze your windows (Appx. 3 hours)
You need: secondary glazing panes, tape measure, hacksaw, adhesive strips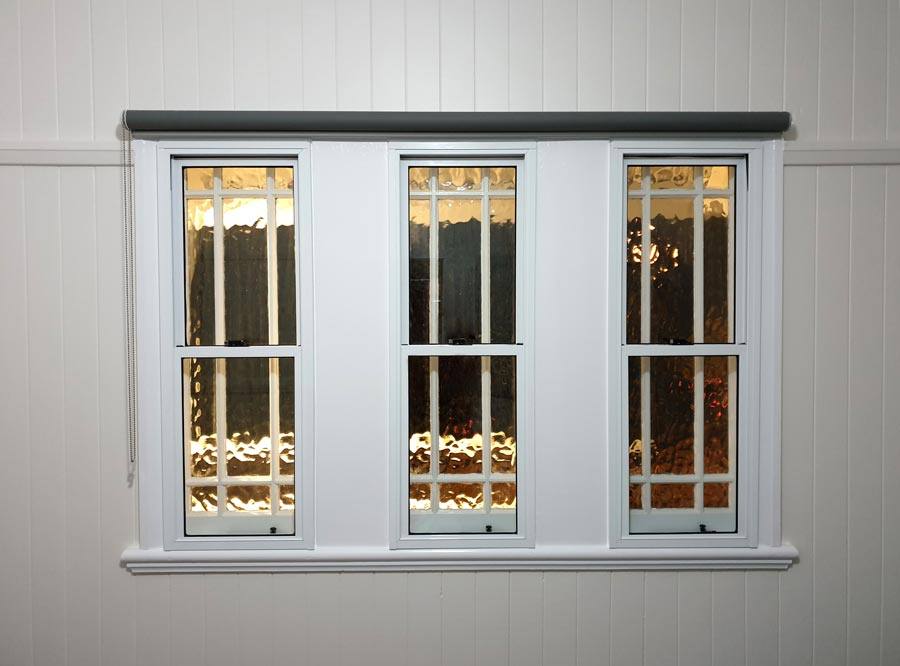 The final essential step is to soundproof your windows. If you put all that effort into soundproofing your ceiling, floor and walls but forgot about the windows, it was all in vain. Remember how we said, “A chain is only as good as its weakest link”? Nearly always the window is the weakest link in the barrier assembly.The best way to acoustically insulate your windows is through secondary glazing. Secondary glazing provides up to 70% noise reduction as opposed to just up to 42% noise reduction with double glazing. Instead of removing the window and replacing with double glazing, simply install a cost-effective add-on window.This process requires you to measure your windows, trim the sheets according to the size of the windows and then cut them with a hacksaw. Once you have the size right, fix adhesive strips along the window frame and line up the sheet to make it fit.Of course, we have oversimplified the process here. Installing a secondary glazed window can be tricky, especially with the sizing and placement. To make the process much quicker, we recommend organizing a free measure and quote with us. After this, we will come and install the custom-made window for you—saving you all that hard work.
Shop Soundproofing Products
That’s it, folks! If you follow all our instructions, you will have the ultimate soundproof media room. No more nagging by the other residents of the house, no more disturbances for either of the parties! It’s a win-win for everyone!
Blast that music loudly and watch your favourite movie without compromising on volume. You can even rage as loudly as you want while playing your favourite video game!
Since the joy of soundproofing is pretty addictive (as you will realize soon), check out the other products we sell. You can soundproof everything from your backyard to heavy machinery. Get in touch with us at Soundproof Warehouse today and we’ll set you right up!
